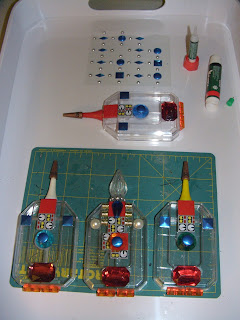
Step 1: Start with a plastic hairpin box from Daiso! In this case, I bought up four of them as I thought it was time to build a matching platoon's worth of these handy heavy-duty tank destroyers... so off to the local Daiso store (where everything is $1.50 unless otherwise marked, the store being a Japanese take on the Dollar Store phenomenon/plague on human civilization), where I purchased four of them, along with a set of plastic pierced earrings that were going to make for some very nice radio antennae! I added a trip to the Michael's craft store nearby, where I stocked up on self-adhesive metal studs and plastic shapes for decorating scrapbooks, which all conveniently were marked on clearance sale (keeping with my philosophy that when it comes to sci-fi wargaming, one doesn't have to win the lottery to build up a respectable combat force!). Here's some shots of the raw materials for building up a platoon of futuristic tank destroyers:
So, the plastic golf tees are also from Daiso ($1.50 for a bag, and they make handy cannon barrels among other uses sci-fi!), while the odd bits in the small plastic box are assorted plastic beads, barrel clasps for making earrings from the craft store, some cheap plastic Christmas decorations from the local Diddams party supply store, and other odds and ends I've accumulated over the years (waste not, want not!).
The plastic bucket in the bottom photograph is not a figment of your imagination, dear reader, but a bucket of Lego parts from the Lego Store. The Lego Store is your FRIEND if you're into kitbashing sci-fi projects! As the article progresses, you'll see just how handy a $6.99 pick-your-own-bits full of goodies from the Lego Store really is...
Finally, there's some cast metal necklace thingamajigs, and some oval wooden plaques from Michael's to act as bases, plus some push pins to act as the upright posts for mounting the finished tank destroyers on to give the impression that these menacing machines are levitating above the ground. So that's the parts inventory, so we break out the tools, and let's get to work!
Step Two: apply a gob of white craft glue to the center of the wooden bases, and place a push pin into the goop, and set them aside to dry:
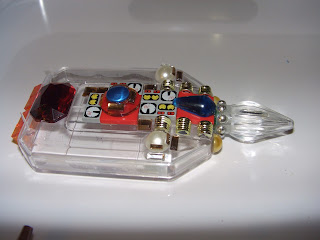
The white glue will take some time to fully dry, however when it does the bond will be very strong. I'll later drill a small hole in the underside of the tank destroyers, and glue them to the push pins with Krazy glue when the models are fully painted and the bases are flocked. So now, on to assembling our quartet of anti-gravity tank destroyers! Out come the X-acto knife and Krazy glue, empty out the hairpins and hand 'em over to my Significantly Better Half as promised, and the bits start to go into place:
Taking a page from actual history, I made three of the tank hunters with dedicated anti-armor weapon systems, while the fourth features a direct fire energy weapon analogous to the 10.5 cm howitzer featured on certain WW2-era assault guns (only a helluvalot nastier in its effects, all the better to bring down a whole apartment building on pesky infantry in a single shot!). So to continue, more bits go onto the former hairpin containers:
The burgeoning energy cannon on the bunker buster variant was a plastic Christmas light bulb; I merely added an actual muzzle to the tip by drilling it out with the tip of my X-Acto knife. The cooling vents located along either side of the base of the weapon are the lower halves of the faux Christmas light decorations I picked up at Diddam's Party Supply, while the teardrop shaped bulge over the base of the gun is the upper half. We now move into the final phase of assembly, adding the remainder of detailing bits, including some very handy self-adhesive square plastic tiles meant for decorating scrapbooks that will make superb reactive block armor:
So now plastic half sphere self-adhesive rhinestones and the female halves of barrel clasps for making earrings have been transformed into heavy machine guns, and the male halves have mated to plastic beads and the aforementioned half round rhinestones have been transformed into rapid fire light energy cannons. The narrow, small rectangular self-adhesive rhinestones have been placed as armored vision blocks, while the larger versions are maintenance access hatches. Various other square and triangular self-adhesive metal shapes now serve as various access hatches, while the square self-adhesive tiles are now aligned around the sides of the tank destroyers as reactive block armor. As a great many of the components were had on sale for a fraction of normal retail prices, the cost of these four nasty characters was a matter of less than the cost of specialty resin or metal model kits.
Next installment: more views of the assembled models, and other mischief!


And this would be why I refer to you as MacGuyver of the Hobbyverse! ;)
ReplyDeleteMwahahahaahaaa!!!
DeleteThanks for this Leland.
ReplyDelete-Eli
Eli,
Deletealways my pleasure! As I stated on TMP, if my humble offerings inspire people and help bring a little new blood to our hobby, then I have done my humble duty of luring in the unsuspecting, and corrupting them accordingly and beyond all recognition! Mwahahahaahahaaa!!! >;)
Absolute Genius! Great post, BWP, thanks for the inspiration!
ReplyDeleteWhy, thank you, kind sir! Next installment will feature these in their primer coat. As it turned out, another poster had persuaded me to sell them as such, so in the interest of keeping this article moving to its logical conclusion, I have begun assembling four additional anti-grav panzerjagers as of this writing... stay tuned!
DeleteWhat an inspirational post. Thanks for sharing it.
ReplyDeletehow to stick plastic to plastic
Thank you for visiting! I have a new post in the offing, a review of many works past and some of the latest mad creations to roll off the workbench, so stay tuned.... ;)
Delete